Why use CineMatch with RawFilm footage?
Using stock footage is a great way to add production value to your videos, bridge gaps in your edit, and provide additional perspectives or pacing to your film.
The key factor to integrating stock footage into your project is making sure it feels seamless and blends naturally with the rest of your native camera footage.
With RawFilm you will have a starting advantage, because the extra flexibility of the RAW codec gives you much more latitude to grade your footage. However, RED cameras have a distinctive color profile and color rendition, and matching this manually to footage from other camera manufacturers such as Canon, Sony, Panasonic, Blackmagic Design, etc, can be tricky, particularly if you’re not a professional colorist.
We’ve created CineMatch as a solution to this grading issue – a fast, easy way to match your RawFilm .R3D footage to any of other 50 digital cinema, mirrorless and DSLR cameras, that works right in your NLE.
With CineMatch, you can grade your projects faster and take advantage of the incredible high-resolution and dynamic range of RED cameras, while still matching the overall visual style of your story.
A-Cam and b-cam terms
In this post, we’ll be using the terms ‘A-cam’ to refer to the main source of footage in your project, shot on your own camera, and ‘b-cam’ to refer to your stock footage downloaded from RawFilm.
This isn’t intended as an insult to the RED footage 🙂 – it just refers to the role the footage will play in your project.
With CineMatch, you match your b-cam footage to your A-cam, so you end up with a seamlessly graded timeline that looks like it was all shot on a single camera.
Using CineMatch in your NLE
Once you’ve downloaded the RawFilm clips you’re going to use in your project, import them into your project.
In the examples below, we’ll be using Adobe Premiere Pro as our editing tool, but the process is very similar in DaVinci Resolve.
You can find our full Workflow Guide on the CineMatch website, but the steps below will help you work specifically with RED .R3D clips from RawFilm.
CineMatch Workflow
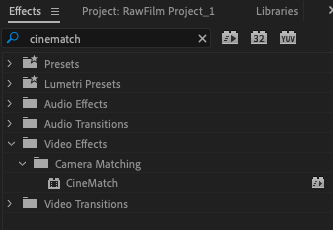
When you’re ready to start color grading your project, you’ll start by adding CineMatch to all the RawFilm clips in your timeline.
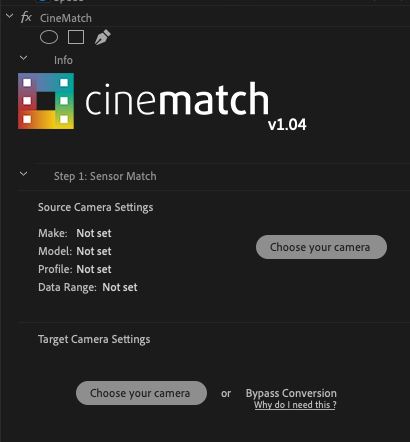
You’ll tell CineMatch the source settings of your footage, and the target camera you’d like to match to.
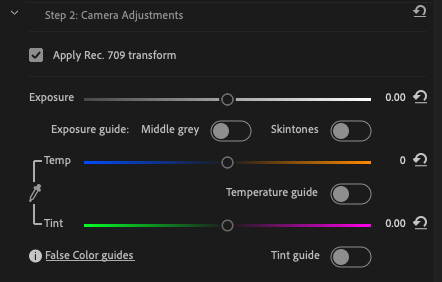
After the sensor match is applied, you’ll make primary adjustments using the custom controls in CineMatch. These controls are customized to the response curve of the camera you’ve chosen, so you will find they will produce much more natural and intuitive grading results than using the generic controls in your NLE.
CineMatch includes False Color views for matching exposure, white-balance and tint, and an auto white-balance picker, which again is customized to the camera you’re using.
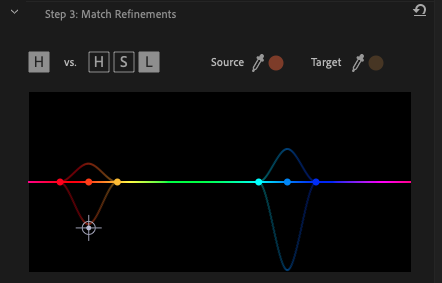
Finally, you can use the HSL tool to make any final slight adjustments to individuals colors to refine your match.
RED Source Settings
(For a more detailed explanation of the recommended RED workflow in Adobe Premiere Pro, check out the guide on RED’s website.)
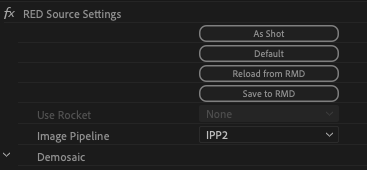
For each RED clip, go to the Master Effect Controls, and make sure the clip is being decoded using the IPP2 Image Pipeline.
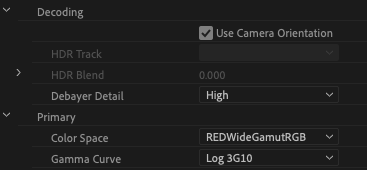
Under the Primary Controls, make sure the Color Space is set to REDWideGamutRGB and the Gamma Curve is set to Log 3G10.
CineMatch Settings
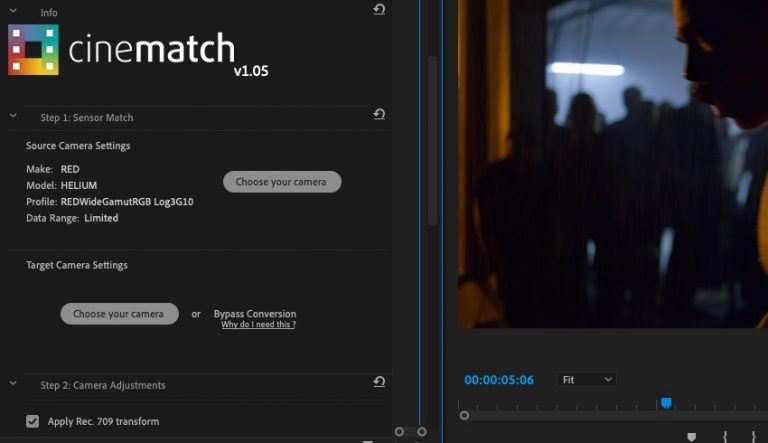
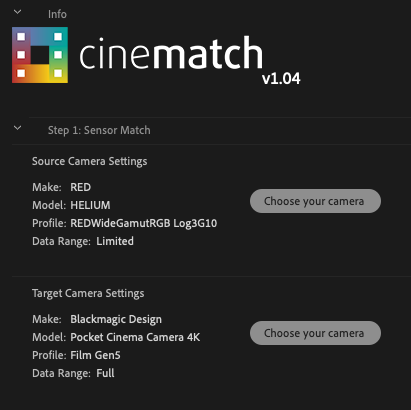
Once CineMatch is applied to your clip, you’ll see a set of steps to follow to match your clips.
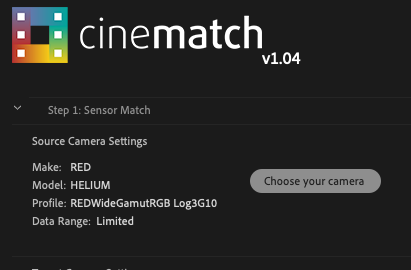
Start by setting the Source Camera Settings to match your RED footage – here, we’re using footage shot on a RED Helium.
For profile, select REDWideGamut RGB Log 3G10, matching the settings applied in the RED R3D settings.
For your Target Camera Settings, select the settings that match how your principal A-Cam footage was shot. Here, we’re using a Blackmagic Pocket Cinema Camera 4K, with the Blackmagic Film profile applied.
You can choose to apply the Rec.709 transform to get a viewable image from your .R3D footage straight away.
Once the Sensor Match has been applied, you’re looking at footage converted to the color science and sensor profile of the BMPCC4K camera – great work!
This will grade exactly the same as the rest of your BMPCC4K footage – you can even apply an entire grade as an adjustment layer over the top of your timeline, and CineMatch will ensure that the RawFilm footage behaves the same way as the rest of your A-Cam timeline.
If you have more than two camera sources in your project (say you have additional drone shots, or b-roll footage from another camera), you can use CineMatch on these clips to match everything to a single source, so your entire film will look matched and ready for a creative grade.
Which RED cameras does CineMatch support?
CineMatch currently supports the RED Helium, Dragon, Epic-M, Epic-X, Scarlet, MX and Red One.
We’re planning to add support soon for the RED Komodo, Monstro, Ranger and other camera sensors available from RED Digital Cinema.
Can I match my other cameras to look like the RED footage?
Yes – CineMatch enables a two-way match between all the camera profiles supported in the plugin, so you could potentially grade all your footage to look like the RED clips you’re including in your film.
This may make your grading take longer, if the RED clips only make up a small proportion of your project, so we generally recommend matching to the most common A-cam source in your project.
This workflow would also allow you to take advantage of the RED IPP2 creative LUTs that RED offers.
How can CineMatch make my camera footage look like a RED?
CineMatch has profiled the individual sensors of over 50 cameras and profiles, and we know how every sensor reproduces every possible color value the camera is capable of capturing.
This means we can create very accurate transforms between the sensor performance of difference cameras, before we apply the manufacturer’s specific color science.
While we can’t invent dynamic range that didn’t exist in the original footage, CineMatch will give you the individual and subtle color characteristics of the target camera, which are very hard to replicate through manual grading.
Can I use CineMatch to target a different camera, like an Arri?
Yes, you can use CineMatch to match your footage to any of the camera profiles we support. You may want to do this to take advantage of the particular color science of a camera you like, such as the Arri Alexa.
Camera manufacturers also put out various LUTs that are designed for specific camera systems, such as Sony’s Technicolor LUTs for the VENICE. You can use CineMatch to match your footage to the VENICE gamma and gamut profile, and then make use of their creative LUTs to give your project a professional look.